1. Update apt repositories
$ sudo add-apt-repository ppa:ubuntu-toolchain-r/test
$ sudo apt-get update
2. Check
$ sudo apt-cache search "g\+\+"
3. Install
$ sudo apt-get install gcc-4.7 g++-4.7
4. Set as a default gcc
$ sudo update-alternatives --install /usr/bin/gcc gcc /usr/bin/gcc-4.6 60 --slave /usr/bin/g++ g++ /usr/bin/g++-4.6
$ sudo update-alternatives --install /usr/bin/gcc gcc /usr/bin/gcc-4.7 40 --slave /usr/bin/g++ g++ /usr/bin/g++-4.7
$ sudo update-alternatives --config gcc
then Select gcc-4.7
5. Confirm
dokyun@redbomb-server:~$ g++ --version
g++ (Ubuntu/Linaro 4.7.3-2ubuntu1~12.04) 4.7.3
Copyright (C) 2012 Free Software Foundation, Inc.
This is free software; see the source for copying conditions. There is NO
warranty; not even for MERCHANTABILITY or FITNESS FOR A PARTICULAR PURPOSE.
dokyun@redbomb-server:~$
2014년 4월 26일 토요일

2014년 4월 15일 화요일
Cyanogenmod source code build env setup ( cm-11 )
You must setup android development enviroment before getting source code cm-11 .
Refer to
http://dokyunblog.blogspot.kr/2012/07/android-tool-chain-install.html
Download cyanogenmod source code
$ cd ~/cm-11
$ repo init -u git://github.com/CyanogenMod/android.git -b cm-11.0
$ repo sync
It take over than 1 hour....keep patient
Refer to https://github.com/CyanogenMod/android/tree/cm-11.0
Download device specific source code
dokyun@redbomb-server:~/cm-11$ source ./build/envsetup.sh
Then execute lunch command
2014년 4월 12일 토요일
LG G Pad install stock rom
1. Go into download mode.
Power off , push volume up/down and power button simultaniouly for a while
when it shows "dwonload mode" box on the screen,
2. go lg mobile downloda center
http://www.lgmobile.co.kr/lgmobile/front/download/retrieveDownloadMain.dev
3. follow as below
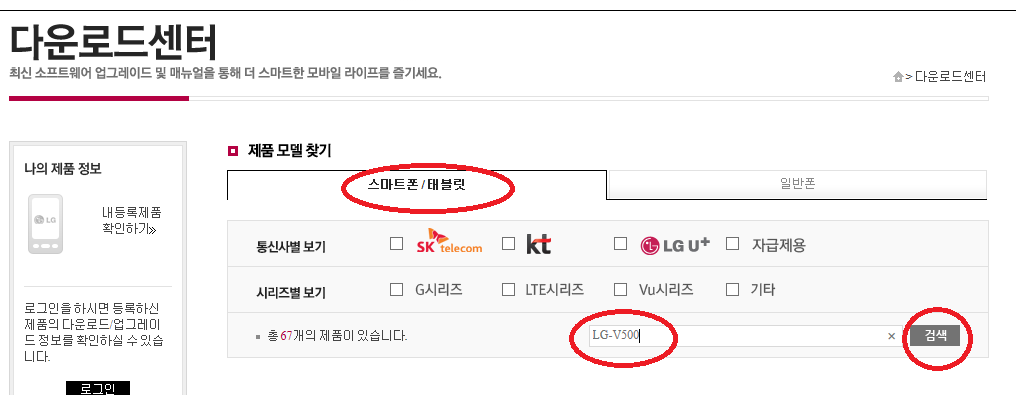
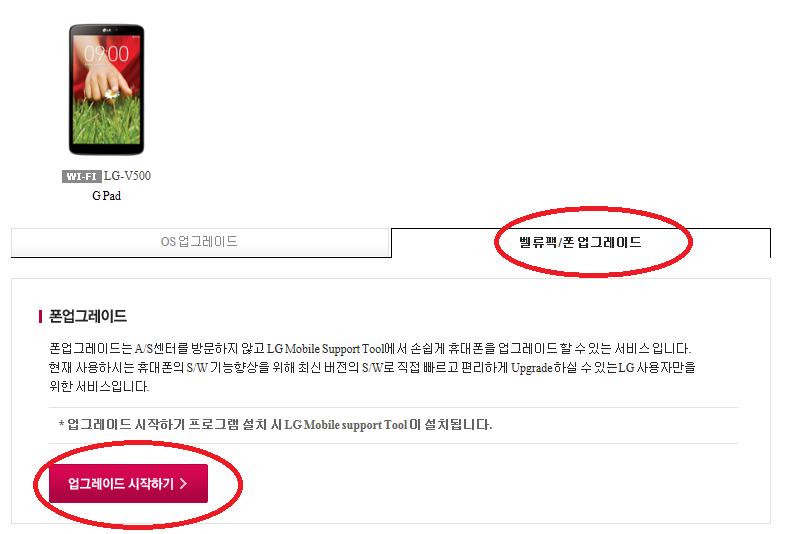
4. Then LG Mobile Support Tool pop-up
5. Install USB driver then connect G-Pad
6. Then select 부가기능 > 업그레이드 오류복구

2014년 4월 11일 금요일
LG G Pad 8.3 v50020a Custom recovery install (TWRP)
There are a lot of methos to unlock bootloader and intall custom recovery for old version of LG G Pad. I tried to those methods...but noting works
Only the below,works under v50020a, before doing this, you must root device.
http://forum.xda-developers.com/showthread.php?t=2698267
In my case, adb reboot recovery command does not works after intalling TWRP.
but I can go into custom recovery mode by key combination.
After installing , you can see below messages when it boot as recovery mode but nothing happens

Refer to below, end of this video show how to go into recovery mode by key combination after TWRP install.
http://www.youtube.com/watch?v=_tOtfF6gKkg


2014년 2월 2일 일요일
Setup Android NDK under windows
1. Install cgywin.
Because windows doesn't have gcc build env, we must install cgywin
Dowload cgywin here
http://www.cygwin.com/
and choose install option only devel
In Korean case, add this http://ftp.daum.net/cygwin for download mirror site.
2. Install Android NDK
downlodd Android NDK here and unzip
http://developer.android.com/tools/sdk/ndk/index.html
For convenience, I unziped it on cygwin/home/administrator directory
3. Setup path
Open .bashrc or .bash_profile export NDK directory
( In my case it located on C:\cygwin\home\Administrator )
export ANDROID_NDK_ROOT=/home/Administrator/android-ndk-r9
Add NDK directory to path
PATH="$PATH:$ANDROID_NDK_ROOT"
Save and close
4. Check NDK sample build
Move to NDK sample directory and build
$ cd android-ndk-r9/samples/hello-jni/jni
$ ndk-build
then you can see belows
Gdbserver : [arm-linux-androideabi-4.6] libs/armeabi/gdbserver
Gdbsetup : libs/armeabi/gdb.setup
Cygwin : Generating dependency file converter script
Compile thumb : hello-jni <= hello-jni.c
SharedLibrary : libhello-jni.so
Install : libhello-jni.so => libs/armeabi/libhello-jni.so
참 쉽죠~~
2014년 1월 4일 토요일
setup android app development enviroment
1. Install JDK
Download JDK and install latest version
http://www.oracle.com/technetwork/java/javase/downloads/index.html
2. Install ADT (Android Development toolkit)
Download ADT and unzip , it does not need to install
http://developer.android.com/sdk/index.html
3. Run SDK Manager under ADT installed directory and install SW pacakges what you need
In my case, it located C:\adt-bundle-windows-x86-20131030\SDK Manager.exe and Android 4.3(API18) is installed

4. After installing package, run eclipse.
In my case, it loacated C:\adt-bundle-windows-x86-20131030\eclipse\eclipse.exe
5. Set up virtual device for debugging
Select menu > windows > android SDK manager then tools > manageADVs on android SDK manager dialog and create virtual device. If your PC is not good enough, vitual device can not run. In this case, select lpw option of vitual device

6. Make sample project
Select file > new > android application project.
Now just setup project name and use default others (just click next)

7. Build project
Right click Project name on Project ecplorer, then select debug as > android application
then application runs on ADV

Right click Project name on Project ecplorer, then Android tools > export signed application package
There is unsigned application package, if you create unsigned package , it can not be intalled so you shoud be better install signed package
For creating signed package, you need keystore. If you already have keystore, select "use existing keystore", if not, select "Create new keystore"

Copy Created APK file to youer phone and run

2013년 12월 8일 일요일
sobel filter by using 2D image interface opencl
I made a simple image sobel filter application using 2D interfacing example.
Firt add sobel filter kernel into imagecpy.cl file and create sobel filter kernel instead of image2d_copier.
__kernel void sobel_rgb(read_only image2d_t src, write_only image2d_t dst, sampler_t sampler)
{
int x = (int)get_global_id(0); int y = (int)get_global_id(1);
float4 p00 = read_imagef(src, sampler, (int2)(x - 1, y-1));
float4 p10 = read_imagef(src, sampler, (int2)(x, y-1));
float4 p20 = read_imagef(src, sampler, (int2)(x + 1, y-1));
float4 p01 = read_imagef(src, sampler, (int2)(x - 1, y));
float4 p21 = read_imagef(src, sampler, (int2)(x + 1, y));
float4 p02 = read_imagef(src, sampler, (int2)(x - 1, y+1));
float4 p12 = read_imagef(src, sampler, (int2)(x, y+1));
float4 p22 = read_imagef(src, sampler, (int2)(x + 1, y + 1));
float3 gx = -p00.xyz + p20.xyz + 2.0f * (p21.xyz - p01.xyz) - p02.xyz + p22.xyz;
float3 gy = -p00.xyz - p20.xyz + 2.0f * (p12.xyz - p10.xyz) + p02.xyz + p22.xyz;
float3 norm = gx * gx + gy * gy;
float3 g = native_sqrt(norm.x+norm.y+norm.z);
write_imagef(dst, (int2)(x, y), (float4)(g.x, g.y, g.z, 1.0f));
}
I got the result as below
참 쉽죠~~


2013년 11월 30일 토요일
opencl 2D image interfacing example
This progame is using opencl load image from the host source image and copy to host destination image buffer. It is helpful to understand 2D image interface of opencl.
I used opencv for loading and showing images.
opencl_image_copy_example
2013년 10월 4일 금요일
opencl helloworld
I made sample opencl program under VS2010
It just do squre float values.
I refered "opencl programming guide" sample for reading cl source from file.
It is more simple and easier to beginner.
dwonload vs2010 project here
2013년 8월 26일 월요일
openCL VS2010 Project
1. Add CUDA include directory
Project properties > General > C/C++ > General > Additional Include Directory > Edit
then add
C:\Program Files\NVIDIA GPU Computing Toolkit\CUDA\v5.0\include
2. Add OpenCL Libs
Project properties > linker > input > addtional dependency
then add
OpenCL.lib
3. 4. Add OpenCL Lib Path
Project properties > linker > general > additional library directory
then add
C:\Program Files\NVIDIA GPU Computing Toolkit\CUDA\v5.0\lib\Win32
In CUDA toolkit, opecCL path is same with CUDA path
When you write include header in source, add just CL path
For example
#include <CL/cl.h>
2013년 8월 25일 일요일
CUDA VS2010 project setup
After new VS 2010 project ,
It needs to add CUDA related enviroment setup
1. ADD CUTA in specifying custom build tools
Right Click project file then select "specifying custom build tools"
Check CUDA 5.0 , Press OK


2. Add CUDA include directory
Project properties > General > C/C++ > General > Additional Include Directory > Edit
then add
C:\Program Files\NVIDIA GPU Computing Toolkit\CUDA\v5.0\include
3. Add CUDA Libs
Project properties > linker > input > addtional dependency
then add
cuda.lib;cudart.lib
4. Add CUDA Lib Path
Project properties > linker > general > additional library directory
then add
$(CudaToolkitLibDir)
Now We can write down basic CUDA API in program.
2013년 7월 7일 일요일
install opencv on windows
------------------------------------------------------
opencv officail home
------------------------------------------------------
http://opencv.org/
------------------------------------------------------
download
------------------------------------------------------
http://opencv.org/downloads.html
1. extract donwload opencv package where do you want to install
- I used opencv 2.4.6
- My installation DIR is C:\opencv_2.4.6
- I test it under VC10
2. set opencv enviroment variable and add path
- open console then enter below command
$ setx -m OPENCV_DIR C:\opencv_2.4.6\build\x86\vc10
- add path
%OPENCV_DIR%\bin
3. create sample project in VS


4. select property manager(?) tab and right click Debug | Win32 then add new project propery
 5. Type the name then create
6. right click the create property sheet, then select propery
7. move c/c++ then add additional include directory C:\opencv_2.4.6\build\include

8. move link, then add additional library directory C:\opencv_2.4.6\build\x86\vc10\lib

8. move link, input directory then add additional dependency and add below libs
opencv_core246d.lib
opencv_imgproc246d.lib
opencv_highgui246d.lib
opencv_ml246d.lib
opencv_video246d.lib
opencv_features2d246d.lib
opencv_calib3d246d.lib
opencv_objdetect246d.lib
opencv_contrib246d.lib
opencv_legacy246d.lib
opencv_flann246d.lib
opencv_imgproc246d.lib
opencv_highgui246d.lib
opencv_ml246d.lib
opencv_video246d.lib
opencv_features2d246d.lib
opencv_calib3d246d.lib
opencv_objdetect246d.lib
opencv_contrib246d.lib
opencv_legacy246d.lib
opencv_flann246d.lib

9 .make main functin as like below
#include "stdafx.h"
#include <opencv\cv.h>
#include <opencv\highgui.h>
#include <opencv\highgui.h>
int _tmain(int argc, _TCHAR* argv[])
{
IplImage * image = cvLoadImage("C:\\Hydrangeas.jpg", 1);
cvShowImage("test image", image);
cvWaitKey(0);
cvWaitKey(0);
cvReleaseImage(&image);
return 0;
}
}
then build and run

2013년 6월 9일 일요일


setup opencl develop enviroment on Android
I used sample source code of aopencl clinfo sample under ubutu 10.04 LTS
Download aopencl
hg clone http://code.google.com/p/aopenclbefore download source code of aopencl , install mercurial
JDK download and install
http://www.oracle.com/technetwork/java/javase/downloads/index.htmlDownload android sdk
http://developer.android.com/sdk/index.htmldownload ADT bundle, it includes the essential Android SDK components
NDK download
http://developer.android.com/tools/sdk/ndk/index.htmlInstall adn 1.8 in your PC
$ sudo apt-get install ant1.8Setup build path
- add platform tools and sdk tools to PATH$ export PATH=/opt/adt/adt-bundle-linux-x86_64-20130522/sdk/platform-tools/:/opt/adt/adt-bundle-linux-x86_64-20130522/sdk/tools/:/opt/ndk/android-ndk-r8e:$PATH
- export ndk path
$ export NDK=/opt/ndk/android-ndk-r8e
- build ndk lib
move to clinfo directory then ndk-build

- update project as you want for example
$ android update project -p . -n clinfo -t 2

- make package
$ ant debug

then you can find clinfo-debug.apk in clino/bin
- download your android phone then install and run
it can works on nexus 4 or over
-

2013년 5월 18일 토요일
opencl sample makefile
Here is the skeleton of my Makefiles for opencl
It almost same as normal unix application Makefile
Add just opencl libs and opencl include directory
It is based on AMD Streaming SDK
Here is the result... I used helloworld sample of opencl programming guide

2013년 5월 11일 토요일
opencl programming guide sample cmake error
env:
ubuntu 10.04
AMD Straming SDK 2.6
CMake shows below error ,
because AMD Straming ASK OpenCl header directory is changed
...
CMake Error at /usr/share/cmake-2.8/Modules/FindPackageHandleStandardArgs.cmake:70 (MESSAGE):
Could NOT find OpenCL (missing: OPENCL_INCLUDE_DIRS)
...
Open
opencl-book-samples-read-only/cmake/FindOpenCL.cmake
add AMD straming SDK opencl include path as llike below
FIND_PATH(OPENCL_INCLUDE_DIRS CL/cl.h PATHS ${_OPENCL_INC_CAND} "/usr/local/cuda/include" "/opt/AMDAPP/include/")
FIND_PATH(_OPENCL_CPP_INCLUDE_DIRS CL/cl.hpp PATHS ${_OPENCL_INC_CAND} "/usr/local/cuda/include" "/opt/AMDAPP/include/")
then cmake
$ cmake ../opencl-book-samples-read-only -G "Eclipse CDT4 - Unix Makefiles"
-- Found OpenCL: /usr/lib/libOpenCL.so
-- Boost version: 1.40.0
-- Found the following Boost libraries:
-- program_options
-- Configuring done
-- Generating done
-- Build files have been written to: /home2/dokyun/dkworks/opencl/build
it is completed
move to chapters 2 sample directory and build , you can find out HelloWorld
$ ls
CMakeFiles HelloWorld.cl Makefile cmake_install.cmake
$ make
Scanning dependencies of target HelloWorld
[100%] Building CXX object src/Chapter_2/HelloWorld/CMakeFiles/HelloWorld.dir/HelloWorld.cpp.o
Linking CXX executable HelloWorld
[100%] Built target HelloWorld
$ ls
CMakeFiles HelloWorld HelloWorld.cl Makefile cmake_install.cmake
env
windows 7
Nvidia CUDA 5.0
use cmake-gui

set source code directory and build binary directory , then configure and generate
2013년 5월 10일 금요일
Installing CUDA toolkit
env
OS : window 7
CUDA version : V5.0
Graphic Card : Geforce 9500 GT
- Cuda toolkit download
https://developer.nvidia.com/cuda-downloads
- Cuda sample download
http://docs.nvidia.com/cuda/cuda-samples/index.html
- Supported GPU list
https://developer.nvidia.com/cuda-gpus
Install only CUDA toolkit, it contains everything you need as you can see

For verifing installation, open a sample and run
For example, in window7, go to
C:\ProgramData\NVIDIA Corporation\CUDA Samples\v5.0\1_Utilities\deviceQueryDrv
then open Visual Studio project , build and run

I used Visual Studio Express 10
You can download here.
http://www.microsoft.com/visualstudio/kor#downloads
Raspberry Pi - cat surveillance system
Install web cam server
http://pingbin.com/2012/12/raspberry-pi-web-cam-server-motion/
I used Logitech C170


2013년 5월 3일 금요일
Install opencl with AMD streaming SDK
Installed env:
OS : unbuntu 10.04 , 64bits
Graphic Card : AMD Radeaon HD 4870
AMD Straming SDK 2.6
- AMD driver download
http://support.amd.com/us/gpudownload/linux/legacy/Pages/legacy-radeon_linux.aspx
http://support.amd.com/us/gpudownload/linux/previous/Pages/radeon_linux.aspx
- stream SDK download
http://developer.amd.com/tools-and-sdks/heterogeneous-computing/amd-accelerated-parallel-processing-app-sdk/downloads/
1. Check your Graphic card supports opencl or not
You can check here
http://developer.amd.com/tools-and-sdks/heterogeneous-computing/amd-accelerated-parallel-processing-app-sdk/system-requirements-driver-compatibility/
if the graphic card is not supported , download lower version and check
AMD-APP-SDK-<version>-RC-lnx64\docsAMD_APP_SDK_Getting_Started_Guide_<version>.pdf
2. install driver and opencl SDK
unzip SDK package then run Install-AMD-APP.sh with root log-in
3. go to <install_dir>/AMD-APP-SDK-v2.x-RC3-lnx64/samples/opencl then make
if you do not install openGL you get build error with below message
/opt/AMDAPP/include/GL/glew.h:1138:20: error: GL/glu.h: No such file or directory
in this case install openGL
$ sudo apt-get install freeglut3-dev
then make again, build will be succeeded
2012년 10월 31일 수요일
ubuntu svn server install ( over apache )
I installed svn server under ubuntu LTS 10.04 64 bits
SVN Server Setup
1. install essentail packages
# sudo apt-get install subversion libapache2-svn apache2
2. create repository
# svnadmin create /home3/swmgr/tmpsvn/sample
3. configure conf file
open /home3/swmgr/tmpsvn/sample/conf/svnserve.conf
then uncommnet belows
auth-access = write ==> set permission
password-db = passwd ==> indicate passward file
auth-access = write ==> set permission
password-db = passwd ==> indicate passward file
open /home3/swmgr/tmpsvn/sample/conf/passwd
then add user and passward
[users]
user = passwddokyun = hellscream
svnserve -d -r /home3/swmgr/tmpsvn/sample
5. check
# svn checkout svn://192.168.0.4 ./svn
or
# svn checkout svn://localhost ./svn
if ,,, /db/txn-current-lock': Permission denied error happens when svn access
check the directory permission.
$ chmod -R 775 /home3/swmgr/tmpsvn/sample
SVN over Apache
# sudo chown -R www-data /home3/swmgr/tmpsvn/sample/
2. configure
open /etc/apache2/mods-enabled/dav_svn.conf
then add
<Location /svn>
DAV svn
SVNPath /home3/swmgr/tmpsvn/sample
AuthType Basic
AuthName "Subversion Repository"
AuthUserFile /etc/apache2/dav_svn.passwd
Require valid-user</Location>
3. add user
# sudo htpasswd2 -cm /etc/apache2/dav_svn.passwd dokyun
or
# sudo htpasswd -cm /etc/apache2/dav_svn.passwd dokyun
4. restart apache
sudo /etc/init.d/apache2 restart
5. check


피드 구독하기:
글 (Atom)