1. Update apt repositories
$ sudo add-apt-repository ppa:ubuntu-toolchain-r/test
$ sudo apt-get update
2. Check
$ sudo apt-cache search "g\+\+"
3. Install
$ sudo apt-get install gcc-4.7 g++-4.7
4. Set as a default gcc
$ sudo update-alternatives --install /usr/bin/gcc gcc /usr/bin/gcc-4.6 60 --slave /usr/bin/g++ g++ /usr/bin/g++-4.6
$ sudo update-alternatives --install /usr/bin/gcc gcc /usr/bin/gcc-4.7 40 --slave /usr/bin/g++ g++ /usr/bin/g++-4.7
$ sudo update-alternatives --config gcc
then Select gcc-4.7
5. Confirm
dokyun@redbomb-server:~$ g++ --version
g++ (Ubuntu/Linaro 4.7.3-2ubuntu1~12.04) 4.7.3
Copyright (C) 2012 Free Software Foundation, Inc.
This is free software; see the source for copying conditions. There is NO
warranty; not even for MERCHANTABILITY or FITNESS FOR A PARTICULAR PURPOSE.
dokyun@redbomb-server:~$
2014년 4월 26일 토요일

2014년 4월 12일 토요일
LG G Pad install stock rom
1. Go into download mode.
Power off , push volume up/down and power button simultaniouly for a while
when it shows "dwonload mode" box on the screen,
2. go lg mobile downloda center
http://www.lgmobile.co.kr/lgmobile/front/download/retrieveDownloadMain.dev
3. follow as below
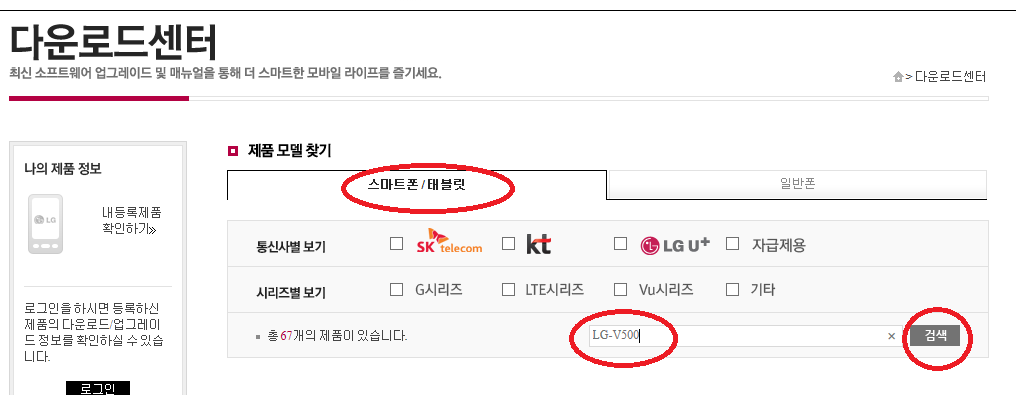
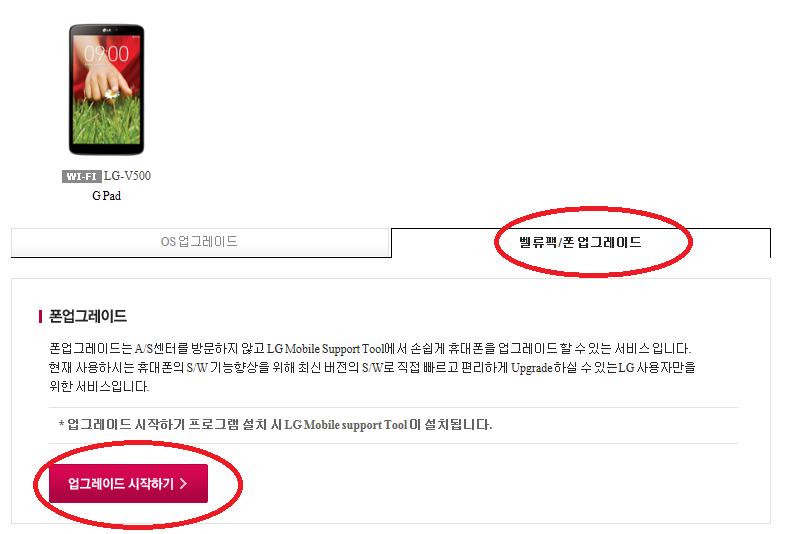
4. Then LG Mobile Support Tool pop-up
5. Install USB driver then connect G-Pad
6. Then select 부가기능 > 업그레이드 오류복구

2014년 4월 11일 금요일
LG G Pad 8.3 v50020a Custom recovery install (TWRP)
There are a lot of methos to unlock bootloader and intall custom recovery for old version of LG G Pad. I tried to those methods...but noting works
Only the below,works under v50020a, before doing this, you must root device.
http://forum.xda-developers.com/showthread.php?t=2698267
In my case, adb reboot recovery command does not works after intalling TWRP.
but I can go into custom recovery mode by key combination.
After installing , you can see below messages when it boot as recovery mode but nothing happens

Refer to below, end of this video show how to go into recovery mode by key combination after TWRP install.
http://www.youtube.com/watch?v=_tOtfF6gKkg


2013년 8월 26일 월요일
openCL VS2010 Project
1. Add CUDA include directory
Project properties > General > C/C++ > General > Additional Include Directory > Edit
then add
C:\Program Files\NVIDIA GPU Computing Toolkit\CUDA\v5.0\include
2. Add OpenCL Libs
Project properties > linker > input > addtional dependency
then add
OpenCL.lib
3. 4. Add OpenCL Lib Path
Project properties > linker > general > additional library directory
then add
C:\Program Files\NVIDIA GPU Computing Toolkit\CUDA\v5.0\lib\Win32
In CUDA toolkit, opecCL path is same with CUDA path
When you write include header in source, add just CL path
For example
#include <CL/cl.h>
2013년 8월 25일 일요일
CUDA VS2010 project setup
After new VS 2010 project ,
It needs to add CUDA related enviroment setup
1. ADD CUTA in specifying custom build tools
Right Click project file then select "specifying custom build tools"
Check CUDA 5.0 , Press OK


2. Add CUDA include directory
Project properties > General > C/C++ > General > Additional Include Directory > Edit
then add
C:\Program Files\NVIDIA GPU Computing Toolkit\CUDA\v5.0\include
3. Add CUDA Libs
Project properties > linker > input > addtional dependency
then add
cuda.lib;cudart.lib
4. Add CUDA Lib Path
Project properties > linker > general > additional library directory
then add
$(CudaToolkitLibDir)
Now We can write down basic CUDA API in program.
2013년 5월 11일 토요일
opencl programming guide sample cmake error
env:
ubuntu 10.04
AMD Straming SDK 2.6
CMake shows below error ,
because AMD Straming ASK OpenCl header directory is changed
...
CMake Error at /usr/share/cmake-2.8/Modules/FindPackageHandleStandardArgs.cmake:70 (MESSAGE):
Could NOT find OpenCL (missing: OPENCL_INCLUDE_DIRS)
...
Open
opencl-book-samples-read-only/cmake/FindOpenCL.cmake
add AMD straming SDK opencl include path as llike below
FIND_PATH(OPENCL_INCLUDE_DIRS CL/cl.h PATHS ${_OPENCL_INC_CAND} "/usr/local/cuda/include" "/opt/AMDAPP/include/")
FIND_PATH(_OPENCL_CPP_INCLUDE_DIRS CL/cl.hpp PATHS ${_OPENCL_INC_CAND} "/usr/local/cuda/include" "/opt/AMDAPP/include/")
then cmake
$ cmake ../opencl-book-samples-read-only -G "Eclipse CDT4 - Unix Makefiles"
-- Found OpenCL: /usr/lib/libOpenCL.so
-- Boost version: 1.40.0
-- Found the following Boost libraries:
-- program_options
-- Configuring done
-- Generating done
-- Build files have been written to: /home2/dokyun/dkworks/opencl/build
it is completed
move to chapters 2 sample directory and build , you can find out HelloWorld
$ ls
CMakeFiles HelloWorld.cl Makefile cmake_install.cmake
$ make
Scanning dependencies of target HelloWorld
[100%] Building CXX object src/Chapter_2/HelloWorld/CMakeFiles/HelloWorld.dir/HelloWorld.cpp.o
Linking CXX executable HelloWorld
[100%] Built target HelloWorld
$ ls
CMakeFiles HelloWorld HelloWorld.cl Makefile cmake_install.cmake
env
windows 7
Nvidia CUDA 5.0
use cmake-gui

set source code directory and build binary directory , then configure and generate
2012년 9월 18일 화요일
sulogin: no password entry for root
default console device is not set properly in inittab
Set tty device in inittab , for example
if console was set as
::respawn:/sbin/getty 115200 ttyO0
in inittab and you started with ttyO2, then
sulogin: no password entry for root
message shows
set
::respawn:/sbin/getty 115200 ttyO2
you can log in properly
2012년 8월 4일 토요일
exporting kernel headers- headers_install
- command for exporting kernel headers in user space
- how to include headers for headers_install
header-y += {header_file_name.h}
For more detail, refer to headers_install.txt
2012년 7월 23일 월요일
Required packages for android
Flex : http://flex.org/
flex is a software development kit for the development (SDK) deployment of cross-platform rich Internet applications based on the Adobe Flash platformBison : http://www.gnu.org/software/bison/
Bison is a general-purpose parser generator that converts an annotated context-free grammar into a deterministic LR or generalized LR (GLR) parser employing LALR(1) parser tablesgnupg : http://www.gnupg.org/
GnuPG is the GNU project's complete and free implementation of the OpenPGP standard as defined by RFC4880 . GnuPG allows to encrypt and sign your data and communication, features a versatile key management system as well as access modules for all kinds of public key directoriesgperf : http://www.gnu.org/software/gperf/
GNU gperf is a perfect hash function generatorcurl : http://curl.haxx.se/
cURL is a computer software project providing a library and command-line tool for transferring data using various protocols. The cURL project produces two products, libcurl and cURL. It was first released in 1997TBD
2012년 7월 21일 토요일
Set up basic development enviroment on ubuntu
install ssh
install samba server
add user
$ smbpasswd -a [user]
edit /etc/samba/smb.conf for adding smb configuration for new user
for example
[dokyun]
comment = dokyun private
browseable = yes
path = /home2/dokyun
guest ok = no
writable = yes
create mask = 0755
for multi-user add below
valid users = dokyun redbomb ...
restart samba server
$smbd restart
install build tool
vim install
It fixs the strange operation of special key input on vi
install vnc server
$ apt-get install vnc4server
create vnc server on 5901 port
$ vnc4server -geometry 1024x768 :1
If you want to see exactly same gui with gnome follow this
1.stop vncserver
2. open ~.vnc/xstartup
3. uncommnet below 2 lines
unset SESSION_MANAGER
exec /etc/X11/xinit/xinitrc
4. change
exec /etc/X11/xinit/xinitrc
to
exec sh /etc/X11/xinit/xinitrc
5. save and exit
6. restart vnc server
install TFTP server
$ apt-get install tftp
$ apt-get install tftpd
Ubutu dose not create /etc/xinetd.d/tftp automatically , in Fedora case it created automatically.
Create and edit /etc/xinetd.d/tftp
Add below
service tftp
{
socket_type = dgram
protocol = udp
wait = yes
user = root
server = /usr/sbin/in.tftpd
server_args = -s /tftpboot
disable = no
per_source = 11
cps = 100 2
flags = IPv4
}
restart xinetd
$ /etc/init.d/xinetd restart
install NFS server
$ apt-get install nfs-kernel-server
add export directory , add below in /etc/export
/targetnfs *(rw,no_root_squash,no_all_squash,async)
restart nfs server
$ /etc/init.d/nfs-kernel-server restart
install ftp server
edit /etc/vsftpd.conf, uncomment below
local_enable=YES ==> for local user log in
write_enable=YES ==> allow up-load
anonymous_enable=NO ==> do not allow anonymous log in
restart ftp server
$ /etc/init.d/vsftpd restart
2012년 7월 17일 화요일
download pre-built android package for TI platform
download pre-built images and source code package
Dwonload TI_Android_GingerBread_2_3_4Sources.tar.gz for source code and cross-tool cahnins
user guide
You can easily get experience of android platform.
2012년 7월 11일 수요일
simple usage of devmem
Introduction
devmem uses /dev/mem and gives convenience for accessing memory io directly on console
Download devmem2.c from anywhere then cross-compile
arm-none-linux-gnueabi-gcc -c devmem2.c -o devmem
usage
./devmem [ADDRESS] w [VALUE]
zlib cross compile
official home
download
or
http://sourceforge.net/projects/libpng/files/zlib/1.2.7/zlib-1.2.7.tar.gz/download
build and install ( cross compile )
You must put CC and others directly
$ CC=arm-none-linux-gnueabi-gcc AR=arm-none-linux-gnueabi-ar RANLIB=arm-none-linux-gnueabi-ranlib ./configure --shared --prefix=$PWD/build
make
make install
2012년 7월 7일 토요일
how to run codesourcery on x86 64bit linux system
In ubuntu 10.04 or higher
$ sudo apt-get install ia32-libs
other cases refer to official pages
https://sourcery.mentor.com/GNUToolchain/kbentry62
2011년 8월 27일 토요일
getting kernel cmdline in kernel
using the macro as below
__setup("console=", console_setup);
it means
if meet "console=" in cmd line call console_setup
피드 구독하기:
글 (Atom)